Sunday, January 6, 2013

Garlic Black Pepper Sausage

This sausage has a very distinct and spicy black pepper flavor and isn’t for those who don’t like pepper very much. Our family LOVES cracked black pepper on everything, so this is one of our favs! This one makes awesome links!!!

garlic black pepper sausage - The Backyard Farmwife This was superb with sautéed cabbage, pierogi with sauteed onions & mushrooms and applesauce!

I suppose you could lessen the amount of black pepper and it would still be a pretty tasty sausage… ;o)

Follow sausage making directions, HERE.

5 pounds ground pork (do it yourself or store-bought)

10 cloves fresh minced garlic

5 Tablespoons freshly cracked black pepper

2 teaspoons red pepper flakes

5 teaspoons salt

5 Tablespoons smoked or sweet paprika

1/4 cup chopped fresh chives

1 cup red wine

1 Tablespoon dried minced onion

Add seasonings to ground pork. Use or freeze within 1-2 days.

Thursday, January 3, 2013

Breakfast Sausage

This is the recipe for breakfast sausage. This recipe is pretty savory, but you can tone it down to your taste. You can use store-bought ground pork or grind your own using the directions HERE. The recipe can be adjusted for larger batches. We made about 15 pounds!

This sausage makes delicious biscuits & gravy, omelets or egg scrambles…

breakfast sausage - The Backyard Farmwife  our lefse burrito

2 pounds ground pork

2 teaspoons salt

1 1/2 teaspoons black pepper

2 teaspoons chopped fresh sage

1/2 teaspoon chopped fresh rosemary

2 teaspoons chopped fresh thyme (we used 1/2 teaspoon dry)

1 Tablespoon brown sugar

1/2 teaspoon nutmeg

1/2 teaspoon cayenne pepper

1/2 teaspoon crushed red pepper flakes

Mix seasonings in a small bowl. Add to ground pork and mix well until fully incorporated.

Chill immediately. Cook a small bit to check taste. Add more spices or more meat according to your taste. Know that they flavor will alter some after a few days.

Use within a day or two or freeze for longer storage.

breakfast sausage - The Backyard Farmwife

Wednesday, January 2, 2013

Sausage Basics

It’s our family tradition to get together with our dear friends every year on New Year’s Day. This year school starts on the 2nd, so we got together to celebrate a bit early. This year’s theme was sausage!

We picked up 80 pounds of pork butt and made our own 7 varieties of homemade sausages! Wow!

Here are some basic steps to remember in making sausage:

*Keep everything VERY cold! The meat, the grinder, everything! If you are doing large quantities, wrap ice packs on the grinder between batches of meat. Be sure to put the meat immediately on ice or in the fridge after grinding.

sausage basics - The Backyard Farmwife

It is amazing how much fat is in a slab of pork butt yet how lean the sausage is! It also makes you wonder just how much fat they put in grocery store sausage??? Ugh!

*Find a recipe and prepare your seasonings. If it calls for larger spices, it’s nice to put them in a grinder or use a mortar & pestle. It brings out the flavor of the spices.
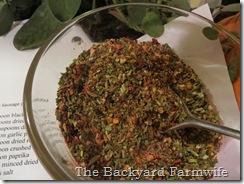
sausage basics - The Backyard Farmwife Spicy Italian seasonings

*Mix the seasonings in with the meat and place immediately back on ice or in fridge!

sausage basics - The Backyard Farmwife this mixer could mix up to 20 pounds but your KitchenAid mixer works well for smaller batches

*Cook up a bit to see if you like the finished product and tweak the recipe as you need. Add more spice or more meat to make it milder or more spicy.

*Now if you’re going to stuff your sausages, you will need casings and the stuffer attachment on your grinder.

Learn how to prep your casings here at The Sausage Maker.

Make an agreement on the sausage stuffing jokes. Either you can make all you want or make none at all. I just couldn’t not make one tiny little joke. ;o)

*Be sure to leave space at either end of your casings for room to twist your sausages. Twist them in reverse directions to they don’t unwind themselves.

 sausage basics - The Backyard Farmwife

making link sausages (no jokes please!) LOL

*It’s also way more fun and way less work to do with good friends!

NO! We didn’t eat all 80 pounds for dinner! Our fridge is full of over 40 pounds of sausage and smells like a German deli… ;o)

sausage basics - The Backyard FarmwifeIt was a very fun evening! Now we just have to decide what kinds to make next time???

Sunday, December 23, 2012

Cheesy Ham & Scalloped Potatoes

We usually end up having this every holiday because we usually end up with leftover ham… It’s pretty easy and for me, one of those comfort foods I just love!

ham & potatoes - The Backyard Farmwife

First I really thinly slice about 6-8 medium potatoes with my PC slicer. I just slice them right into my greased 9x13 baking pan.

ham & potatoes - The Backyard Farmwife

Toss in some cut up ham.

ham & potatoes - The Backyard Farmwife

Then mix in about 1 cup of shredded cheddar cheese with the potatoes and ham.

Then you need to make your white sauce.

Melt 1/4 cup butter in a medium saucepan over medium heat. Cook 1/4 cup finely chopped onion in the butter for about 1 minute.

ham & potatoes - The Backyard Farmwife

Add 1 heaping Tablespoon of flour and salt & pepper to taste. Whisk together and quickly stir in 2 cups of milk. Whisk until smooth.

ham & potatoes - The Backyard Farmwife

Heat until thick and bubbly and then continue to cook for 1 minute.

ham & potatoes - The Backyard Farmwife Pour over potatoes.

ham & potatoes - The Backyard FarmwifeCover with foil and bake at 375 for 1 hour.

ham & potatoes - The Backyard FarmwifeWhile potatoes are baking, make breadcrumbs for the top. (You can also use store bought breadcrumbs.)

I just take a cooled piece of toast and run them in my food processor until fine crumbs.

ham & potatoes - The Backyard Farmwifeham & potatoes - The Backyard Farmwifeham & potatoes - The Backyard Farmwife     Mix 1/2 cup of shredded cheddar in with the bread crumbs.

ham & potatoes - The Backyard FarmwifeAfter potatoes have cooked for 1 hour, remove the foil and top with breadcrumbs and sprinkle with paprika.

Place back in oven and cook for about 20 minutes or until potatoes are tender.

ham & potatoes - The Backyard Farmwife

Thursday, September 6, 2012

Buttery Blueberry Nectarine Cobbler

This is a variation on my blackberry cobbler and it’s possible I like it even more than the original! The blueberries and nectarines make for a very lovely combination in this buttery cobbler!

Eat it warm and store the leftovers in the fridge.

1/2 cup butter

2 cups flour

2 cups sugar

3 tsp baking powder

1 tsp salt

2 cups milk

1 tsp vanilla

1/4 teaspoon cardamom

4 cups (total) of  fresh sliced nectarines and blueberries (blueberries may be frozen)

buttery blueberry nectarine cobbler - The Backyard Farmwife

Preheat oven to 350. Once oven temp is reached, melt butter in 9x13 pan.

Stir together the flour, sugar, baking powder, salt, milk, vanilla and cardamom; batter will be slightly lumpy. Pour half of batter on top of melted butter in pan. Spread fruit over lubatter and pour remaining batter over the fruit.

buttery blueberry nectarine cobbler - The Backyard Farmwifebuttery blueberry nectarine cobbler - The Backyard Farmwifebuttery blueberry nectarine cobbler - The Backyard Farmwife

Bake in preheated oven for one hour or until golden brown.

buttery blueberry nectarine cobbler - The Backyard Farmwife

Wednesday, August 15, 2012

Coconut Butter Mochi

For my group supper at Bible Camp this year, I did a Hawaiian theme. Since I wanted to be somewhat authentic and have two gluten free friends, this recipe was just the thing!

Much denser and richer than a cake, this dessert is pretty rich but super delicious! Be sure to cut the squares on the smaller side… Store it in the fridge to keep longer.

1 pound mochiko (rice flour)

2 1/2 cups sugar

1 teaspoon baking powder

1/2 cup melted butter

1 can coconut milk plus enough whole milk to equal 3 cups total

5 eggs

1 teaspoon vanilla extract

1 cup sweetened, flaked coconut

Preheat oven to 350.

Mix dry ingredients (minus coconut) in large bowl. Beat together milks, eggs and vanilla. Pour liquid ingredients into the dry ingredients. Mix in melted butter and coconut.

Pour into greased glass 9x13 baking dish.

Bake for 50 minutes – 1 hour. The top and edges will be light golden brown.

Cool on baking rack and cut into squares when completely cooled.

Store it in the fridge to keep longer.

butter mochi - The Backyard Farmwife

Tuesday, August 14, 2012

Omelet in a Bag

Second only to my boil in bag cooking, this is the best camping recipe ever! It turned out so well, that I even made them at home after our trip to Yellowstone! You can make these for 1 to 20, all you need is more eggs and a bigger pot!

Beat desired number of eggs with a splash of milk. I make our omelets with 3-4 eggs each, but you can make them smaller.

omelet bag 01

Divide the egg mixture evenly into heavy duty freezer bags. I use pint-sized Ziploc brand freezer bags. Don’t use cheap bags, they’ll melt!  At this point you can freeze the eggs in the bags for camping. Just throw them into the cooler frozen and use them after they’ve thawed.

omelet bag 03Prepare your favorite omelet fillings. I sautéed onions, mushrooms and peppers. Then threw in crumbled bacon and grated cheese.  For camping, I froze all my fillings in a bag that were thawed when I was ready to use them.

omelet bag 02

Add your fillings into your egg bags. Squeeze out as much of the air as you can from the bags before sealing. Gently squeeze bags to mix up your fillings into the egg mixture.

omelet bag 04

Place bags into a large pot of boiling water.

omelet bag 05 Return water to a boil. Reduce heat to a simmer. Cover and simmer for 10-15 minutes or until eggs are no longer runny. They may not take as long if you use fewer than 3 eggs per bag. You can check them and return them to the pot if they aren’t done yet.

omelet bag 06They will probably float to the surface, but don’t worry they’ll still cook.

You can eat them from the bag…

bag omelet 01Our omelet in Yellowstone

Or remove it onto a plate…

omelet bag 07Our omelet at home